Cascading Slicers
- This functionality creates a "waterfall" effect, from one slicer to the next
- Cascading filters can also be configured via the Formulate module - click here to learn how
- You can create complex cascading slicers, containing multiple levels, very easily from the Discover module, without having to manually build any complex business logic
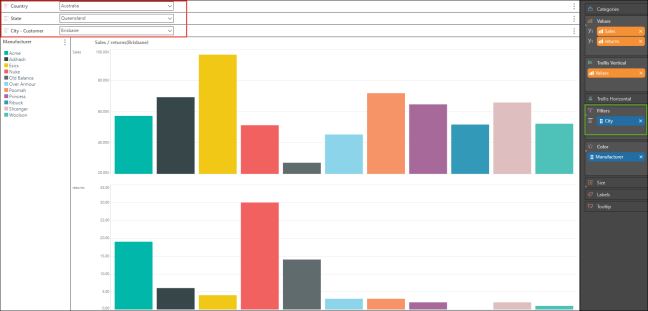
- In the example below, the cascading filter is comprised of the Country hierarchy at the first level, and the State hierarchy at the second level
- The first level drives the second level, which in turn drives the filtering of the visualization
- In this scenario, this means that when a country is selected from the first filter, the second filter dynamically changes to display only the states within the chosen country
- Once the state is selected, the visual is filtered accordingly
Click here to learn how to manually build cascading slicers using lists and parameters. To learn about configuring cascading slicers in presentations, see Cross Filter Slicers.
Cascading Slicers
Cascading slicers let users pick one item in a slicer to trigger a change in the next slicer and so on.
How to build a Cascading Slicer
- Add the hierarchy that will be the lowest level of the cascading slider to the drop zone - for instance, as a Filter (green highlight below)
- If the slicer will contain two filters, the second filter level must be added to the Filter zone
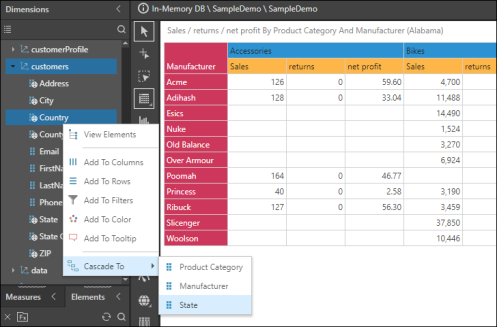
- In the Dimensions panel, find the hierarchy that will be used as the next level of the slicer, and right click on it
- Under 'Cascade To,' select the hierarchy that you added to the Filter zone
- Each level of the cascading filter will be added as a filter (red highlight) - these filters can be repositioned as required. Each filter is driven by the filter above it, with the top level filter driving all filters.

- You can also 'Cascade To' a hierarchy that is in the Rows, Columns, or even Color drop zone, rather than Filters - this way, the hierarchy comprising lowest level of the cascading slicer will be displayed within the query, rather than in slicer (red highlight below)
- The hierarchies comprising the upper level filters will be displayed as slicers (green highlight)

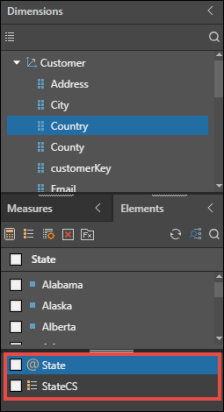
- Each level of the cascading slicer will appear underneath the Elements panel (red highlight below)
- The lowest level will appear as a list, and the upper levels will appear as parameters - when you create cascading slicers with more than 2 levels, you will 'Cascade To' the parameter containing the previous level of the slicer (designated by an @ icon)
- Right click on any of them to open the logic in Formulate, make it shareable in the CMS, delete it, or use it to create a quick calculation

Example: Build a Cascading Slicer
In the following example, the grid displays Sales, Returns, and Net Profit for Product Category and Manufacturer
STEP 1
Add a hierarchy from the Dimensions panel to the Filters zone - this may or may not be a hierarchy that exists within the query. In this example, the State hierarchy was added. This will be the second level filter.

STEP 2
To add the first level filter, find the hierarchy which should cascade to the second filter. Both hierarchies must belong to the same table, and must have a hierarchical relationship - for instance, Country and State, State and City, Product Category and Product Sub Category.
In the dimensions panel, right click on the hierarchy, and under Cascade To select the hierarchy that was added as a filter in the previous step.

STEP 3
The Country hierarchy is now added as the first level filter, and cascades to the State filer.
When United States is selected, only states within the USA will be available from the state filter. But if Australia is selected, then only Australian states will appear in the state filter.
Save the visualization.

STEP 4
The slicer will also be added under the elements panel as business logic: it can be selected or deselected, as with any other items.
Right click on the slicer to delete it or save and share it. Select Make Sharable to save the slicer to the CMS - it will then be available in the Content Explorer, and can be added to other queries.

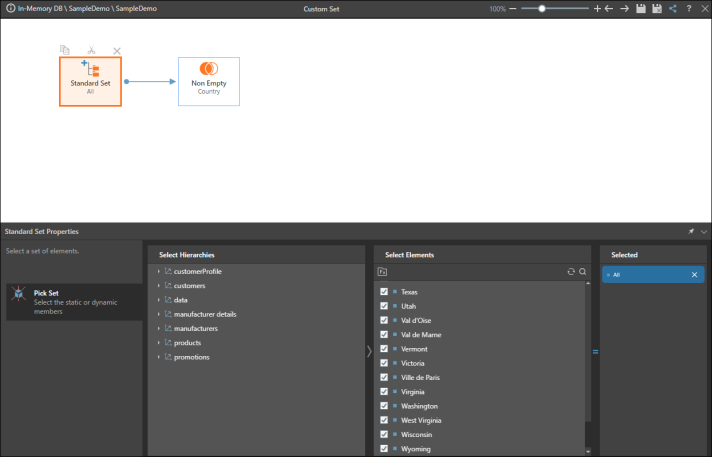
You can also open the slicer in Formulate: it will be opened in the custom set editor in Lists.
